
one native american girl's experience with modern quilting
Tuesday, August 31, 2010
Lots of Go! giveaways
I have noticed a lot of AcuQuilts being given away this week with the same requests for entries...hmmm. well i will post about only one as using this to post about all of them would be kind of cheating...i do not want that. you have until september 2nd to enter on sherri's blog..a quilting life. Good luck to you!


Monday, August 30, 2010
A Winner and a Huge Thank You!!
True Random Number Generator
Min: 1
Max: 120
Result: 41
Powered by RANDOM.ORG
Congragulations to the winner,
Patty said...
You sewing room is gorgeous! Zoe looks like my dog Rooney even the little bit of white on her chest. We got him in New Hampshire last year around this time, but he's originally from Kentucky. I can't over the resemblance! I now follow you blog and this fabric would be ideal for a wall hanging I'm making during a retreat it's kinda like an American Beauty.
August 25, 2010 5:13 PM
Patty, i hope you enjoy the fat quarters. I had to go back and find you twice as the random number generator erases the number. just an fyi for those who may use it in the future. I also reduced the number to 120 due to multiple entries in case anyone was wondering. Patty, I will email you and get your information so i can get your package to you.
It is so wonderful to be back and i am overwhelmed by all of your comments! I had a lot of fun reading over some of your blogs and everyone had so many nice things to say as well as some wonderful ideas! i have not cut into the stash myself so i thought i would easily make up my mind how to use it after reading your responses. i was so wrong. overwhelmingly most would make a quilt and i think the d9p gets the most votes BUT a few of you sent links to patterns confusing me even more....hahaha. i think i will do what i normally do. circle around flickr, fondle the fabric, sketch around abit, fondle the fabric more and eventually make a decision.
I wanted to address some specific questions and since i DID take the process pledge i am applying it to the sewing room. yes, i had a great room to start with. since we are basically empty nesters i do not have small ones running around and getting into things. just zoe and, as you could see, she is an excellent friend. she naps through most of it. I forgot to add that i bought a battery operated dirt devil upright that swivels. so..no dog hair or thread is left behind. i vacuum each day the room is used. the room is a basement which is good because i am out of the way, it is quiet, it is cool in the summer and warm in the winter but i only have one little window. the before pic clearly shows i had piled everything in here and it was a mess but once i got going here are the things that made it easy and inexpensive to complete.
1. The pegboard. it is actually two white pegboard sheets. cost: 12.00 ea. at home depot. 4 nails and small peices of styrofoam taped behind it to keep it off of the wall.
the pegboard kit. I used every piece in this kit. here is the link. cost 13.00. that was it. Total 37.00
2. The design board. this is nothing but styrofoam sheets found at lowes or home depot for around less than 10.00. they are around 1x12x36" in a package of 6 and my husband measured the wall, taped multiple pieces together into a two sheet thickness (we could not find the thicker ones). i covered it with a package of warm and natural queen sized quilt batting (i thought white would get dirty faster) that i got on sale and secured it with t-pins. The entire wall was less than 30.00.
3. The cutting table was found at ReStore. If you have one in your area I strongly encourage you to go there. You can find virtually anything to build a house, room, whatever for a very good price and a very good cause. It is the Habitat for Humanity Warehouse. I picked up that table for 30.00 and it just needed a good cleaning. If i had a larger room I could have found much more there.
4. The fabric cabinet was found at a local used furniture store. I did not even have to paint it. It was ready to go and i would be embarassed to tell you how much fabric that dude can hold. I wish i had room for another one. I wish i could find another one. it did cost around 120.00. I always bargain at these stores. It pays off! The smaller shelved cabinet and the chest of drawers also came from used furniture stores, they were each less than 30.00 each and needed a fresh coat of paint.
5. Most of the decor (including the Couture pics, rugs and fat quarter baskets,) were found at tjmaxx or marshalls over a period of time.
6. Zoe was found at the local animal shelter a year ago last january. support your local shelter. she is the best dog i have ever had.....truly.... :)
7. The rest of it you all already know where to find!


Min: 1
Max: 120
Result: 41
Powered by RANDOM.ORG
Congragulations to the winner,
Patty said...
You sewing room is gorgeous! Zoe looks like my dog Rooney even the little bit of white on her chest. We got him in New Hampshire last year around this time, but he's originally from Kentucky. I can't over the resemblance! I now follow you blog and this fabric would be ideal for a wall hanging I'm making during a retreat it's kinda like an American Beauty.
August 25, 2010 5:13 PM
Patty, i hope you enjoy the fat quarters. I had to go back and find you twice as the random number generator erases the number. just an fyi for those who may use it in the future. I also reduced the number to 120 due to multiple entries in case anyone was wondering. Patty, I will email you and get your information so i can get your package to you.
It is so wonderful to be back and i am overwhelmed by all of your comments! I had a lot of fun reading over some of your blogs and everyone had so many nice things to say as well as some wonderful ideas! i have not cut into the stash myself so i thought i would easily make up my mind how to use it after reading your responses. i was so wrong. overwhelmingly most would make a quilt and i think the d9p gets the most votes BUT a few of you sent links to patterns confusing me even more....hahaha. i think i will do what i normally do. circle around flickr, fondle the fabric, sketch around abit, fondle the fabric more and eventually make a decision.
I wanted to address some specific questions and since i DID take the process pledge i am applying it to the sewing room. yes, i had a great room to start with. since we are basically empty nesters i do not have small ones running around and getting into things. just zoe and, as you could see, she is an excellent friend. she naps through most of it. I forgot to add that i bought a battery operated dirt devil upright that swivels. so..no dog hair or thread is left behind. i vacuum each day the room is used. the room is a basement which is good because i am out of the way, it is quiet, it is cool in the summer and warm in the winter but i only have one little window. the before pic clearly shows i had piled everything in here and it was a mess but once i got going here are the things that made it easy and inexpensive to complete.
1. The pegboard. it is actually two white pegboard sheets. cost: 12.00 ea. at home depot. 4 nails and small peices of styrofoam taped behind it to keep it off of the wall.
the pegboard kit. I used every piece in this kit. here is the link. cost 13.00. that was it. Total 37.00
2. The design board. this is nothing but styrofoam sheets found at lowes or home depot for around less than 10.00. they are around 1x12x36" in a package of 6 and my husband measured the wall, taped multiple pieces together into a two sheet thickness (we could not find the thicker ones). i covered it with a package of warm and natural queen sized quilt batting (i thought white would get dirty faster) that i got on sale and secured it with t-pins. The entire wall was less than 30.00.
3. The cutting table was found at ReStore. If you have one in your area I strongly encourage you to go there. You can find virtually anything to build a house, room, whatever for a very good price and a very good cause. It is the Habitat for Humanity Warehouse. I picked up that table for 30.00 and it just needed a good cleaning. If i had a larger room I could have found much more there.
4. The fabric cabinet was found at a local used furniture store. I did not even have to paint it. It was ready to go and i would be embarassed to tell you how much fabric that dude can hold. I wish i had room for another one. I wish i could find another one. it did cost around 120.00. I always bargain at these stores. It pays off! The smaller shelved cabinet and the chest of drawers also came from used furniture stores, they were each less than 30.00 each and needed a fresh coat of paint.
5. Most of the decor (including the Couture pics, rugs and fat quarter baskets,) were found at tjmaxx or marshalls over a period of time.
6. Zoe was found at the local animal shelter a year ago last january. support your local shelter. she is the best dog i have ever had.....truly.... :)
7. The rest of it you all already know where to find!
so...that is the story of the sewing room and some tips for you. I hope yours turns out to be one you are happy with. I did keep a folder of ideas and rooms and it helped. Here are some of the images from my folder.


I want to send out a special thank you to those of you who sent so many here from your wonderful blogs. It is much appreciated.
Congragulations to our winner!
hugs,
leslie
Congragulations to our winner!
hugs,
leslie
Tuesday, August 24, 2010
SEWING ROOM REMODEL....COMPLETE! ....AND A GIVEAWAY
oh my goodness you all. i lost an entire summer and have missed you. i have had multiple issues from a broken foot to family crisis..blah, blah, blah. however, do you remember this? this was when i was at a goodstage in the process. it got much much worse.
 |
| the before |
i am so happy to have this done and all of you have given me so much inspiration. here is the end result.


i know it looks like a big jumbled overcrowded area but really i found room for everything. i had a lot of fun with the details even though i have yet to recover the lampshade and chairs.
 |
| my sewing table has access to both computers |
 |
| the rolling cart has everything i may run out of |
 |
| i finally have a desk for some organization ......and shopping |
 |
sometimes you find just the right thing.  the pegboard freed up a lot of room |
 |
| even a place for zoe's treats |
 |
| zoe |

a great design wall 95x75 inches
i love my hubby
i am going to leave it at that. if you would like to see the full scheme of my sewing room i invite you to go to my flickr page. i do not want to bore you to tears here.
THE GIVEAWAY!
i wanted to thank all my friends and followers, swappers and bee buddies for their unyeilding patience with me this summer. almost all my projects have been late and nothing of any interest has been on the blog. i will be giving away a full FQ set of AMY BUTLER LOVE. why amy you ask? i found when i rearranged all my fabric that i had more of her fabric lines than i thought. it really grew on me and i have seen some beautiful things made with it. i wanted to get it in before SOUL BLOSSOMS comes in so we all have a chance to work with love before we spend our money on the next release.
to enter simply join my blog. mention it on your own blog and if you do not have one have a friend do it for you. spread the word (guilds and groups,) and let me know what you think you might do with it when you post. i have seen a beautiful disappearing nine patch by providence handmade, i hope she posts it...as well as some clothing.
the last day for entering is sunday the 29th at midnight. the winner will be chosen by a random generator and will be notified by email (do not forget to leave me yours when you follow and join.)
good luck . i have missed you guys so much
hugs,
leslie
 |
full set of FQ of Amy Butler LOVE |
how cute are these? from rubyandstellahome on flickr


Sunday, May 2, 2010
Have you ever used Electric Quilt?
I personally have not but would love to and just in time. EQ7 is coming soon! Do you know how much easier this will make designing? Stay tuned to my blog. Hopefully I will have some exciting news! If you have used it let me know what you think.
hugs, leslie
p.s. sorry for the long absence, i am catching up!
hugs, leslie
p.s. sorry for the long absence, i am catching up!
Wednesday, March 10, 2010
IT CAME!!!
I thought it would be around a week but they made me wait just a wee bit longer. i know other blogs have these same pictures with the same topic but this blog is mine....and so is the fabric...well...i am splitting it with Mel and Steph but the remainder is mine!

step 1. Open the box...eeee!!! all wrapped in tissue and adorably peeking!

Step 2. Count the packages and admire the Spoonflower logo printed on cotton.
Step 3. Sort, love, caress, admire, photograph. I cannot wait to get my needle on these little babies!!


How cute are THESE!!!!!
THANK YOU HEATHER!!!
AN APOLOGY

my dear friends...i am so sorry for the delay in posting but do i have excuses. first of all my sewing room in undergoing a major overhaul. you know...the kind where you pull everything out and decide what in the heck you are going to do with stuff you do not want and all of the stuff you do want is there too? that kind of thing. i have a new design board and the old one is still up, along with old lamps, furniture and posters. it is all going. i have old cabinets in there and then of course i found a wonderful little glass doored cabinet at an antique store. now i have just way too much stuff. i have also been out of town for a bit which slows things down but i am getting ready to ramp up. i am going to redesign this blog. i do not like it anymore. i need to get rid of inventory and once and for all design this sewing room the way it needs to be. you can clearly see that i need at least one more of these cabinets. they will hold everything from 1/2 yard to 3 yards. Fats need to go elsewhere. i tend to keep all my heather seperate as well as my flea market fancy. I keep those in their own bins. I would like another cabininet though so i can see all of them as well as the fat quarters.
 is still up, along with old lamps, furniture and posters. it is all going. i have old cabinets in there and then of course i found a wonderful little glass doored cabinet at an antique store. now i have just way too much stuff. i have also been out of town for a bit which slows things down but i am getting ready to ramp up. i am going to redesign this blog. i do not like it anymore. i need to get rid of inventory and once and for all design this sewing room the way it needs to be. you can clearly see that i need at least one more of these cabinets. they will hold everything from 1/2 yard to 3 yards. Fats need to go elsewhere. i tend to keep all my heather seperate as well as my flea market fancy. I keep those in their own bins. I would like another cabininet though so i can see all of them as well as the fat quarters.
we have been moving slow on the guild work as well and that has to be done. i am hoping stephanie will say okay to the first meeting which i would like to have a week from this saturday...(hear that steph?)
i am sure you all noticed from my extremely long tutorial that i did manage to perfect the circle of geese blocks. i will learn how to do a less wordy tute but i really wanted you all to know how to do it if you had tried and gotten frustrated like i did. These are the three i have completed, i have three more to go.


hopefully the blog will be prettier soon, the sewing room complete (don't forget i am planning a giveaway when it is done) and my entire world will be happy! here are some happy pics! i received my 100 blocks mag...yay! heather ross piles....just makes me smile.....little birdy feet in the snow.


love to all
leslie
Monday, February 8, 2010
CIRCLE OF GEESE TUTORIAL FOR DUMMIES
As you all know I recently completed (well...kind of) a circle of geese block which turned out less than acceptable. I promised I would try one more time before I gave up. What I discovered were very simple mistakes which, when corrected, made this block a pleasure to make. This is not a tutorial for advanced quilters as they would not have made dumb mistakes. This tutorial is for those who have never paper pieced and may think the way I do. If most of your quilting has been improv and wonky blocks then you may have picked up some things that work in that wonderful freeform environment that do not particularly work in the accurate art of paper piecing.
Here goes. The original tutorial I used is here. It is a great tutorial but I had some issues that were all my fault but I thought I would share. First, grab last nights leftover cherry pie...wait..no...put that down. Seriously....
You will find the template for the block here. This step is critical. Begin by printing the template on printer paper. At this point take your paper a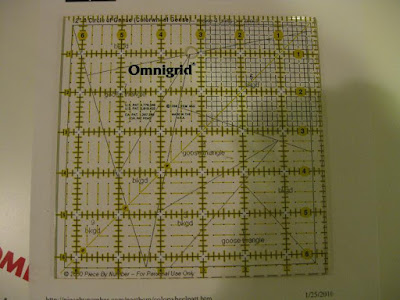 nd place your 6.5 inch ruler over it.
 nd place your 6.5 inch ruler over it.
If it does not line up EXACTLY with your ruler you will need to increase your template accordingly. With mine, I had to increase my printer setting to 107%. make sure it is exact. Yours may be right or completely different than mine. Play with it until it is perfect.

The next step for success was paper choice. I used artists tracing paper. It comes in a large tablet. I got mine at michaels. I use it for tons of stuff. You need it anyway....trust me.
I cut it down to 8x11 and fed it through my printer. It helped to place a piece of printer paper behind it to help feed it into the printer. At that point it went through smoothly. If it does not keep trying with the stiffer paper behind it. It took me several attempts and I think it is worth it in the end. Take care taking it out as the ink is very wet. make four of them per block. Check each of them against the ruler when dry. Print out 4 extra templates on printer paper, check these as well. You now have 4 templates on tracing paper and 4 on printer paper.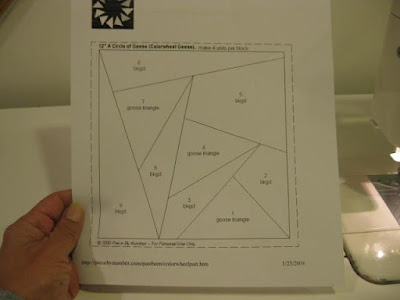


The next is more template prep. Take your 4 printer paper templates and cut out each piece a little larger than they are.
I have no idea why this picture is sideways but you get the idea. you will need all 4 pages to get all of the pieces cut. By the way...I am no sewing photographer so forgive some of the blurry pics and the very dry sewing hands...I am need a mani/pedi...back to this.

Once you have these cut it is time to prepare your fabric. take the time to cut all of the pieces. it will save time in the end.
Take your fabrics of choice and trace around them...I use the chalk pencil I bought at joanns. I love the thing. it stays put until you pat it out and has  several colors for all colors of fabric. I highly recommend that little purchase.
I highly recommend all purchases..hehe.
 several colors for all colors of fabric. I highly recommend that little purchase.
I highly recommend all purchases..hehe.

I am showing the base fabric here but you will do the same with each piece of fabric you are using. I chose twelve "geese" fabrics so I cut twelve triangles from the triangle template which is number 1, 4 and 7. of course you only need one of those as they are all the same size.
 *note* If you are fussy cutting the triangles you need to place your fabric behind the tracing template before cutting it. Decide where you want it and mark it before cutting it out. You do not want a gnome with no head.....
This is what you should have when you are through. Twelve triangles and four piles of each numbered fabric.

Now it is time to make the block. This is really easy. take piece number one and place it right side up on the back of the tracing paper template. make sure it is 1/4" over all lines and especially make sure it reaches the bottom seam line. you DO NOT want to come up short.

Because of this i am going to recommend pinning heavily during this block. this is the first pin. pin this in place as you are going to be flipping the paper back and forth.

Flip block over and make sure it is positioned correctly. now fingerpress a mark right along the line of the template. you want to place the next template piece correctly. you will know this by its shape and what happens when you "butterfly" the piece out. Once you have it. pin this piece (away from the sewing line). Flip and sew down the first line.


You can clearly see where you are sewing and if you have enough fabric but I take a peek underneath to make sure no fabric has turned on itself (can you tell this has happened?) When you have finished you will see your perfect little seam. *note* I set the stitch length very short 1.4 so the foundation paper is easy to remove.

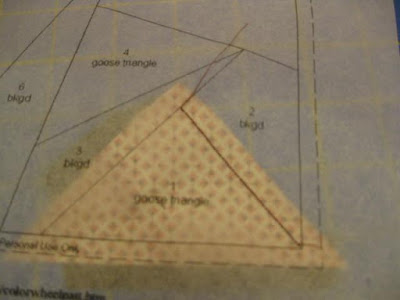


Now you have two pieces that are now one. Start again by fingerpressing right along the line. Piece 3 now is placed. Because you cannot iron press between piecing I pin all three places. I want the "geese" not to bunch so i pull it taut and pin. You are always going to sew on the face up side of the template (Watch the pin placement!) Broken needles are not good!
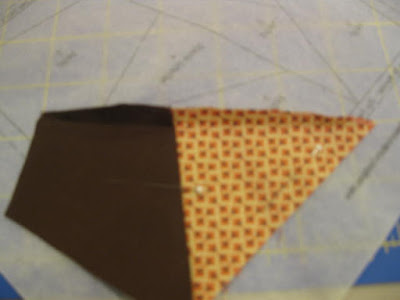
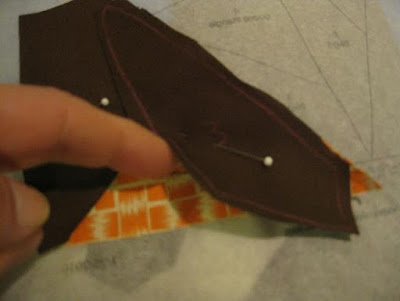


Sew along the next line and repeat. Fold fabric on the line.
Place next template piece, nestle and fold both. Pin, flip and sew.
Once you have completed a seam you may trim the excess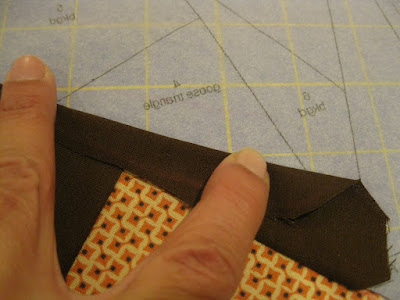 fabric away. Be extremely cautious not to cut away so much that the next piece will be short. Always open the butterfly fold before you sew or cut away fabric so you can see where the next piece will go.
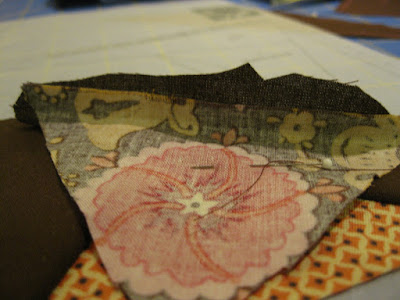
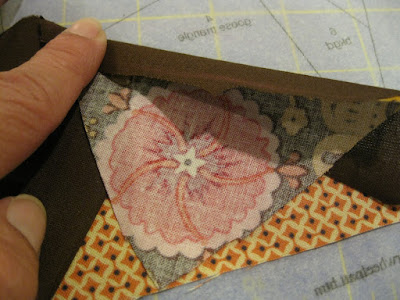
Once you have completed a seam you may trim the excess
 fabric away. Be extremely cautious not to cut away so much that the next piece will be short. Always open the butterfly fold before you sew or cut away fabric so you can see where the next piece will go.


Hang in there, we are almost done!
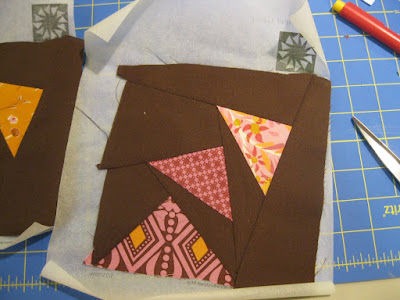
Continue this process in order until all four blocks are complete. At this point go ahead and press them fabric side UP. Leave the template on.
Place template side up and rotary cut along the outside line.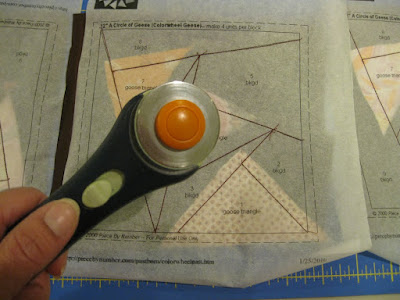

Place template side up and rotary cut along the outside line.


You should now have four perfect 6.5 inch squares.
Remove the template. It should easily pull away. You may have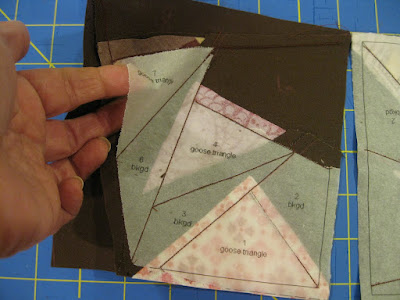 to flick a few teeny pieces away in tight areas but it is easy. When you have all the templates removed you can once again take the time to trim back any seams that are too wide. This is especially important if your base color is white or another light color. Be extra careful where you are cutting!!! You can imagine....I know you can.....aacckkk.
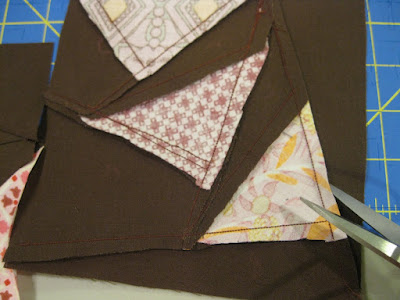
Remove the template. It should easily pull away. You may have
 to flick a few teeny pieces away in tight areas but it is easy. When you have all the templates removed you can once again take the time to trim back any seams that are too wide. This is especially important if your base color is white or another light color. Be extra careful where you are cutting!!! You can imagine....I know you can.....aacckkk.
We are in the home stretch. Press your squares again. Eyeball your arrangement of geese until you like the layout. Hopefully you did a little of this before you began but if you didn't you still have some control. Sew two of the squares facing each other 1/4" seam, pin it well and press the seam to one side.

With the second set you will press the seam to the opposite side. This is 101 to you guys I know but I have to cover my bases.
Make sure when you connect both pairs  of squares that the center seams are opposite and "lock" into that familiar little square!
 of squares that the center seams are opposite and "lock" into that familiar little square!
When you complete this last seam, open,
press and guess what!!!! You should be able to place your 12.5 inch ruler on it and this is what it will look like....
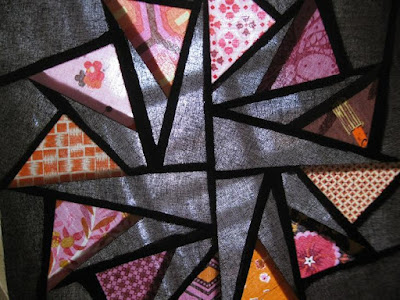
a perfect 12.5 inch circle of geese block.
Pat yourself on the back for completing your block!
I love the way they look with the light behind them.................Thanks and I sincerely hope that you understand this and do not come away more confused. If you have questions I will be happy to answer them...
hugs,
leslie
Subscribe to:
Posts (Atom)